Hi and welcome to Jennifer's arts & crafts blog!!

Translate

Saturday, 10 November 2012

Lip balm making.

Have you ever tried creating homemade cosmetics of any sort? Me? Never.  Well at least not until now.

I bought a nifty wee kit off the popular Ebay and it arrived today.

To make lip balms, all you basically need is the following ingredients (to make approx. 12 tubes):

4 oz carrier oil
30g  pure beeswax
5 ml  flavouring oil  (I used apple)

Method:
  1. Place the beeswax into a jar and place this in a pot of hot water that is just gently simmering , not boiling.
  2. Stir now and again , and once the beeswax has started to melt a little, add the 4oz of carrier oil and mix at intervals.
  3. Once the beeswax has melted, lift out of the pot and set aside.
  4. Allow to cool slightly then add the flavouring oil, using a pipette.
  5. Mix thoroughly then pour into the empty lip balm tubes.
  6. Allow to cool thoroughly, then place caps on.
  7. Stick on some homemade labels and voila!!


I used Safflower oil as the carrier oil but Jojoba/Sweet Almond oil is just as effective


I designed these labels from my own computer.


Here are the applied labels!!


I used lip balm tubes but you can also get empty pots with lids at any good craft store or do a search on ebay.    I will give these to friends and family - however, please note that if you are planning to sell these on at any scale in the UK or EU, you need to be aware of the legal side of selling handmade cosmetics and you most likely will require what is known as a Cosmetic Safety Assessment.   (This is extremely important - please Google for further information)

What will you create today?

Monday, 8 October 2012

Mosaic Heaven

I love to experiment with mosaics and this is my latest creation......


Materials used were: MDF Square mirror, tesserae (mosaic tiles), grout, PVA glue.

This really was simple to make.
  • First you take your tiles and arrange them on your wooden blank, then take some PVA glue and glue them on.
  • Allow to dry for at least 24 hours ~ longer if possible.
  • Apply the grout (ready made or grout powder to make your own is fine) in between the spaces
  • Smooth over, and within 5 - 10 minutes go over each tile with a damp clean cloth and wipe away the excess grout.
Et, Voila!
You can basically make anything by decorating blanks with mosaic tiles.

*                      *                    *

Here is a second project I have started just recently:

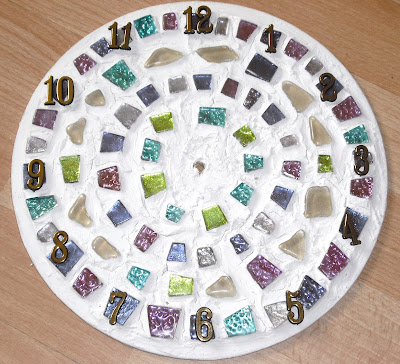
The materials I used are a circular wooden blank disc with a hole drilled into the centre, clock hands & mechanism set, clock adhesive numbers tiles, PVA glue, ready-made grout.

Step 1

As with the above project , I lined the tiles firstly on the disc in a nice pattern, glued them using PVA glue.
Then I filled in the gaps with the grout , and let it 'set' for 24 hours.


Step 2

I then attached the adhesive numbers around the clock perimeter


Step 3

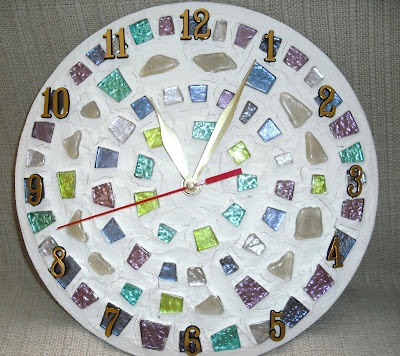
Finally, I fastened the clock mechanism on the back & the clock hands on the front.


There you have it! A handmade mosaic clock!!

Wednesday, 26 September 2012

All about sewing...

Don't you ever get moments where inspiration just comes to you naturally?
I felt like this today ~ and took myself to the craft store in the next village near where I live, which is an Aladdin's cave of fabrics for all sorts of occasions. This company has been running for 40 years since  it opened in 1971, a good three years before I was even born!
 
I always love coming here, although the last time I set foot in the shop was for a job interview 2 years ago to work as a sales assistant. Needless to say I never got the job!!

I came out with some GORGEOUS fabric ~in saying that, I haven't sewn in a long time!!     Well, I spotted some skulls fabric which immediately reminded me of my sister who is into such things!!

I bought half a metre :


To be honest, I am a novice at sewing, and here is what I ended up making.....(like I said,  the cushion has it's imperfections. Oh well , practice makes perfect as they say!!)


I used a cushion blank, and inserted it inside the cushion cover which I had made from two squares of the fabric sewn onto an  8 " zip.    Then I added a cute gothic charm onto the zip as a finishing touch.....et voila!!!!

Easy peasy!!


I am planning on making a similar cushion very soon, only with a French design (Paris-themed fabic finished off with a small Eiffel tower charm on the zip!!)~ since I am a Francophile at heart..

                    *                                     *                                       *                                       *

My very first cushion:


                  *                                       *                                          *                                    *


What will you create today?   Can any of you come up with ideas on what I should make with this satin feel material? The most inspiring idea will win a prize from my own craft box!!  Feel free to add comments below!!

Tuesday, 25 September 2012

Here's some I made earlier!

My local Dunelm Mill store has introduced a new craft range recently and I was happy to see a much larger choice of beads/jewellery making supplies than was there before.

Bead Cafe bugle beads & heart charms

Mixed beads bracelet made from crackle glass beads/millefiori beads etc.

Spacers, faux pearl & shell beads were used.

Celestial surprise!

Friday, 7 September 2012

**Craft Giveaway**

I have been doing a clearout of my craft cupboard and found lots of stuff I no longer use or need.

Just leave a comment under this post for a chance of winning the following pictured items:

Cupcakes Stickers/Xmas glitter/Merry go round 3D sticker/12 m metallic craft cord


Best of luck!!
And , keep a look out for more future giveaways!!


Crafting for relaxation....

There is nothing quite like having a couple of hours to yourself and to be able to sit down and craft in peace and quiet.    My favourite craft is cardmaking!!     Here are some of my recent makes:

Forever friends are my favourite cute characters!


I used a wooden Santa embellishment on this one.

Lovely!

Bear on a sleigh.


And a notecard

French-themed


Sunday, 2 September 2012

Earrings galore!!!

Sorry for not updating in a while.  I have been busy....making earrings!!

Crackle glass beads & seed beads were the main materials

Blue/copper crackle glass beads the focal point of this pair.

Millefiori beads are stunning when put together with rhinestone spacers & plastic pearl beads.

Simple yet pretty design!

                 *                               *                                *                                    *                              *


It's been a while since I have made cards, so when I came across this cardmaking kit whilst out shopping yesterday, I just had to buy it!!     With it being a fraction of the original rrp, I was delighted and it was brand new!

So, it's always worth your while looking at charity shops...you never know what treasures you might find!!


With Christmas and the festive preparations fast approaching (slightly more than 16 weeks), it is time to make cards..... how many of you actually make your own cards?!

Here's some I made earlier:


I love cute designs especially Forever Friends!

The caption says 'Happy Christmas' in Chinese.

I used a Rudolph chipboard embellishment as the main piece.

Rudolph reappears!

Thursday, 23 August 2012

And summer is over...well, almost!

It is time to think of the upcoming autumn/winter months now and now is the perfect time to knit.
I learnt the basics of knitting when I was in P.5 (year 5 of Primary school), they called it 'Needlework' back then...here is a scarf I recently made. 

I used PomPom turquoise wool bought from a discount store, I find such stores can sometimes stock quite high quality makes of wool....and they are easier on the pocket too!

My own personalised fabric labels      


And, here is another project I have started:

I used purple glittered double knitting wool and a K2P2 pattern to create the 'ribbed' effect as you can see...watch this space for the end result!!     


                             *                         *                      *                      *                       *             


Papercraft competition results:

I am pleased to announce that the winner of the papercraft competition (13th July) is
V. Griffiths from Northants.  Many congratulations Virginia - your prize is winging it's way to you shortly!!


                  *                     *                      *                   

Friday, 13 July 2012

*****PAPERCRAFTS GIVEAWAY*****

I haven't done any crafting today. So I went and decluttered my cardmaking cupboard.

I bought these on ebay a year ago and never got round to using them.
So, I have a challenge for you.   Simply click on the following link and fill in the poll to be in with a chance of winning the above cute items!

Click here for competition

The winner will receive the following brand new items: 

Cupcakes embellishments/stickers

Smirk Clear stamps - sports themed

Gem embellishments

Pack of Smirk paper strips/backing paper 


Best of luck to you!


Thursday, 12 July 2012

Cards to make on a rainy day!!

Materials used:  Cupcake backing paper, Happy Birthday banner, embellishments

Materials used: patterned backing paper, alphabet chipboard embellishments, embellishment


Materials used: embossed paper,  paper flowers & sticker, Mother vellum banner.


Materials used:  Thank you paper words, cute picture, cupcake backing paper

Materials used:  backing paper, lace adhesive paper ribbon, flower embellishment, Congratulations banner


Materials used: Chinese coin charm, Chinese hole punch, fabric flowers, brads, Best wishes sticker, paper ribbon